Bonus Holiday Cookie!

OK, so yes, we completed the Seven Days of Cookies, but in the course ofIMG_3696 all that baking, I came across a recipe from Alice Medrich that cried out to be tried. So even though I’ve been rolling [in] dough for a week, I had to make one more batch of cookies.

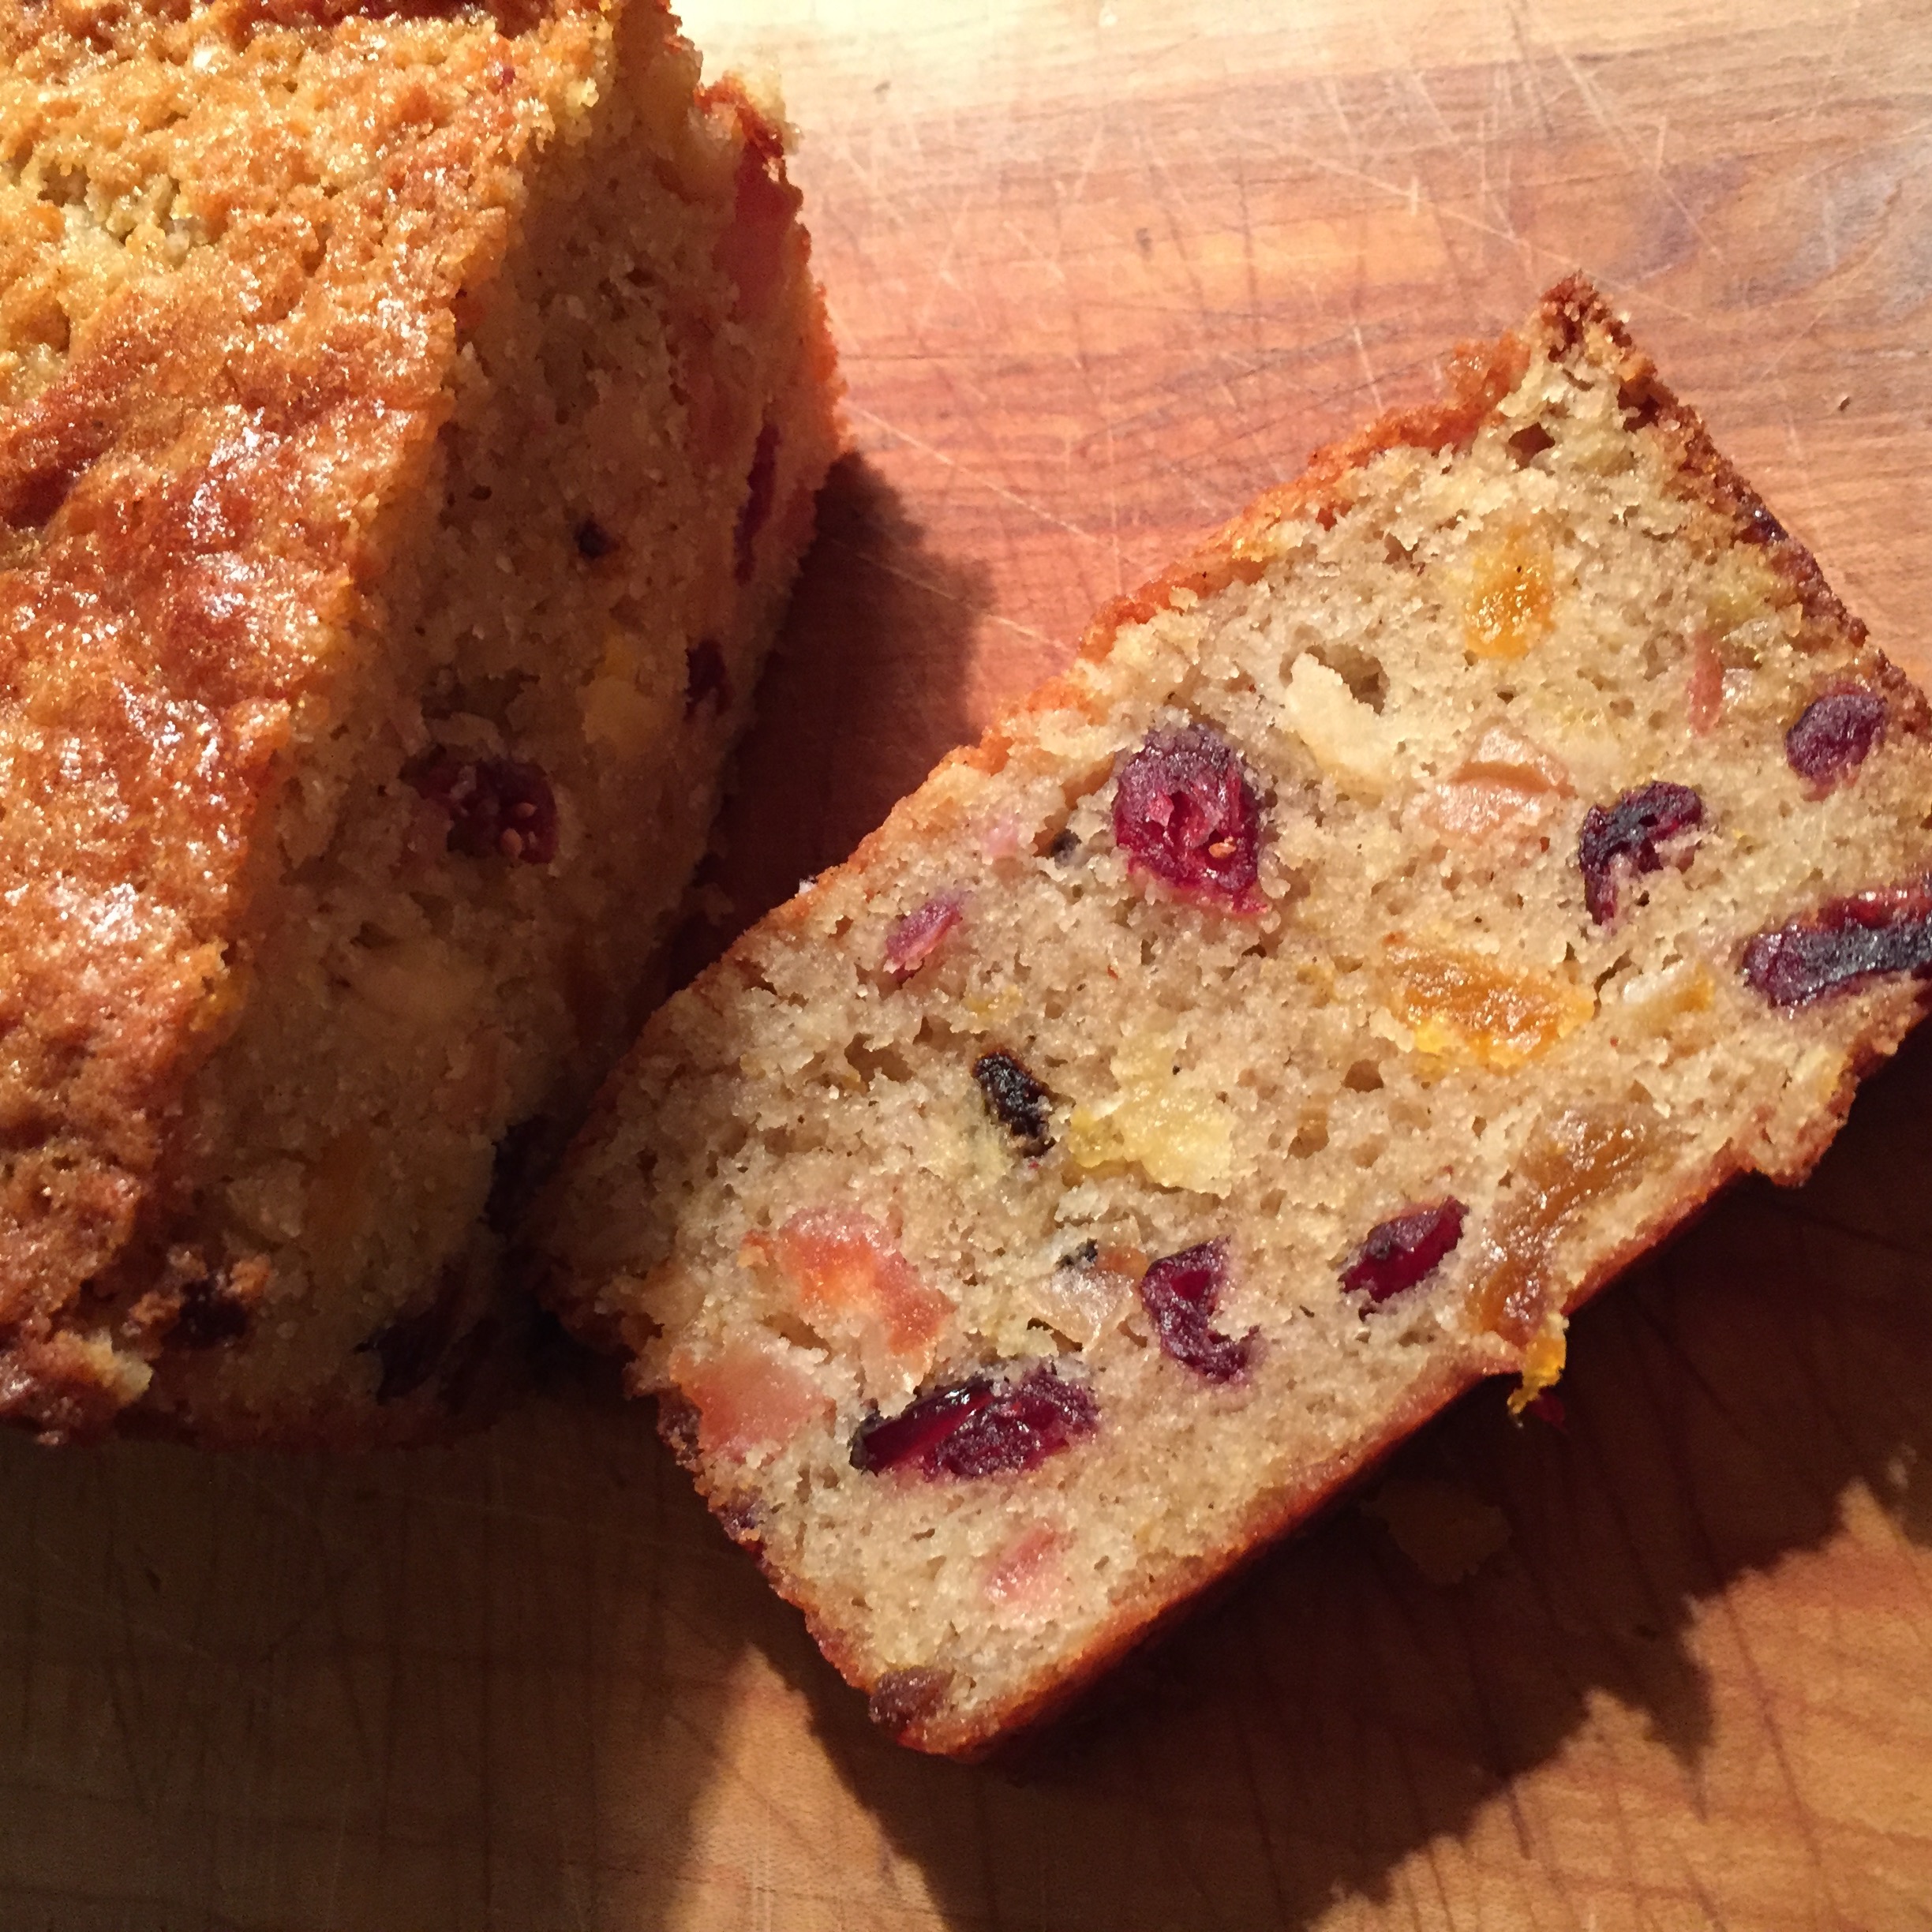
These are called Pebbly Beach Fruit Squares. The recipe is from Medrich’s Chewy Gooey Crispy Crunchy Melt-in-Your-Mouth Cookies. These are beyond delicious, a crispy-chewy sandwich of delightfulness.

Notes

  • Alice says these cookies can be customized to your taste through your choice of fruit and spice. I love cranberry and orange so I used dried cranberries and candied orange peel with just a touch of cinnamon.
  • Make sure your fruit is moist! If it’s not, Alice says to soak it in water, juice or spirits for about 20 minutes (any longer and it will be too mushy to use). Pat dry before using.
  • Do the best you can when rolling the dough. It was a bit sticky so I rolled it between two pieces of parchment, flipping it several times and smoothing the paper. Even then I fell short of the desired 16.5 inch length.

I wasn’t sure whatIMG_3697 to expect from this cookie. I knew it would be good (Medrich, dried fruit, butter), but I wasn’t prepared for just how good. The kind of good that makes you laugh out loud.

Which is truly the best way to conclude a “baker’s dozen” of Seven Days of Cookies.

Enjoy! And have a beautiful Christmas!

Pebbly Beach Fruit Squares

Adapted from Alice Medrich

Ingredients

1 3/4 c plus 2 Tbs flour

1/2 tsp baking powder

1/4 tsp salt

8 Tbs (1 stick) unsalted butter, softened but still cool

3/4 c granulated sugar

1 large egg

1 tsp vanilla

Finely grated zest of one medium lemon and one smallish orange

1/2 c moist candied orange peel

½ c moist dried cranberries (coarsely chopped to about the same size as the orange peel)

1/4 tsp cinnamon

1/4 cup crystal sugar

Preparation

Whisk together flour, baking powder, and salt in a bowl and set aside.

squareIn a medium bowl (with a mixer set on low), beat butter with the granulated sugar until smooth and well blended but not fluffy. Add the egg, vanilla, and both zests, and beat until smooth. Add flour mixture and mix until completely incorporated.

Divide the dough in half and form each into a rectangle about ¼ inch thick. Wrap the patties in plastic wrap and refrigerate for at least 2 hours.

Preheat oven to 350 degrees. Position racks in the upper and lower thirds of oven. Line two large baking sheets with parchment and set aside.

In a small bowl, stir together the dried fruits with the cinnamon.

Remove dough from the refrigerator and let sit for 15 minutes to soften slightly.

IMG_3682On a sheet of parchment at least 17 inches long, roll one piece of dough into a rectangle 8.5 inches by 16.5 inches. With a short side facing you, scatter half of the dried fruit on the bottom half of the dough. Fold top half of the dough over fruit, using the paper as a handle. Gently peel paper from the top of dough. (If it sticks, chill dough for a few minutes until the paper peels easily.)

Press the top of the dough down lightly, then dust with half of the coarse sugar, again patting it lightly to make sure the sugar adheres. Use a heavy knife to trim thIMG_3683e edges. Then cut it into 4 strips and then cut each strip into 4 pieces to make 16 squares. Place cookies 2 inches apart on lined or greased cookie sheets. Repeat with remaining dough, fruit, and sugar.

Bake for 12 to 15 minutes or until edges are lightly browned. Rotate pans from top to bottom and from front to back halfway through the baking time to ensure even baking. Let cool on sheets for about 10 minutes, then move to racks to cool completely.

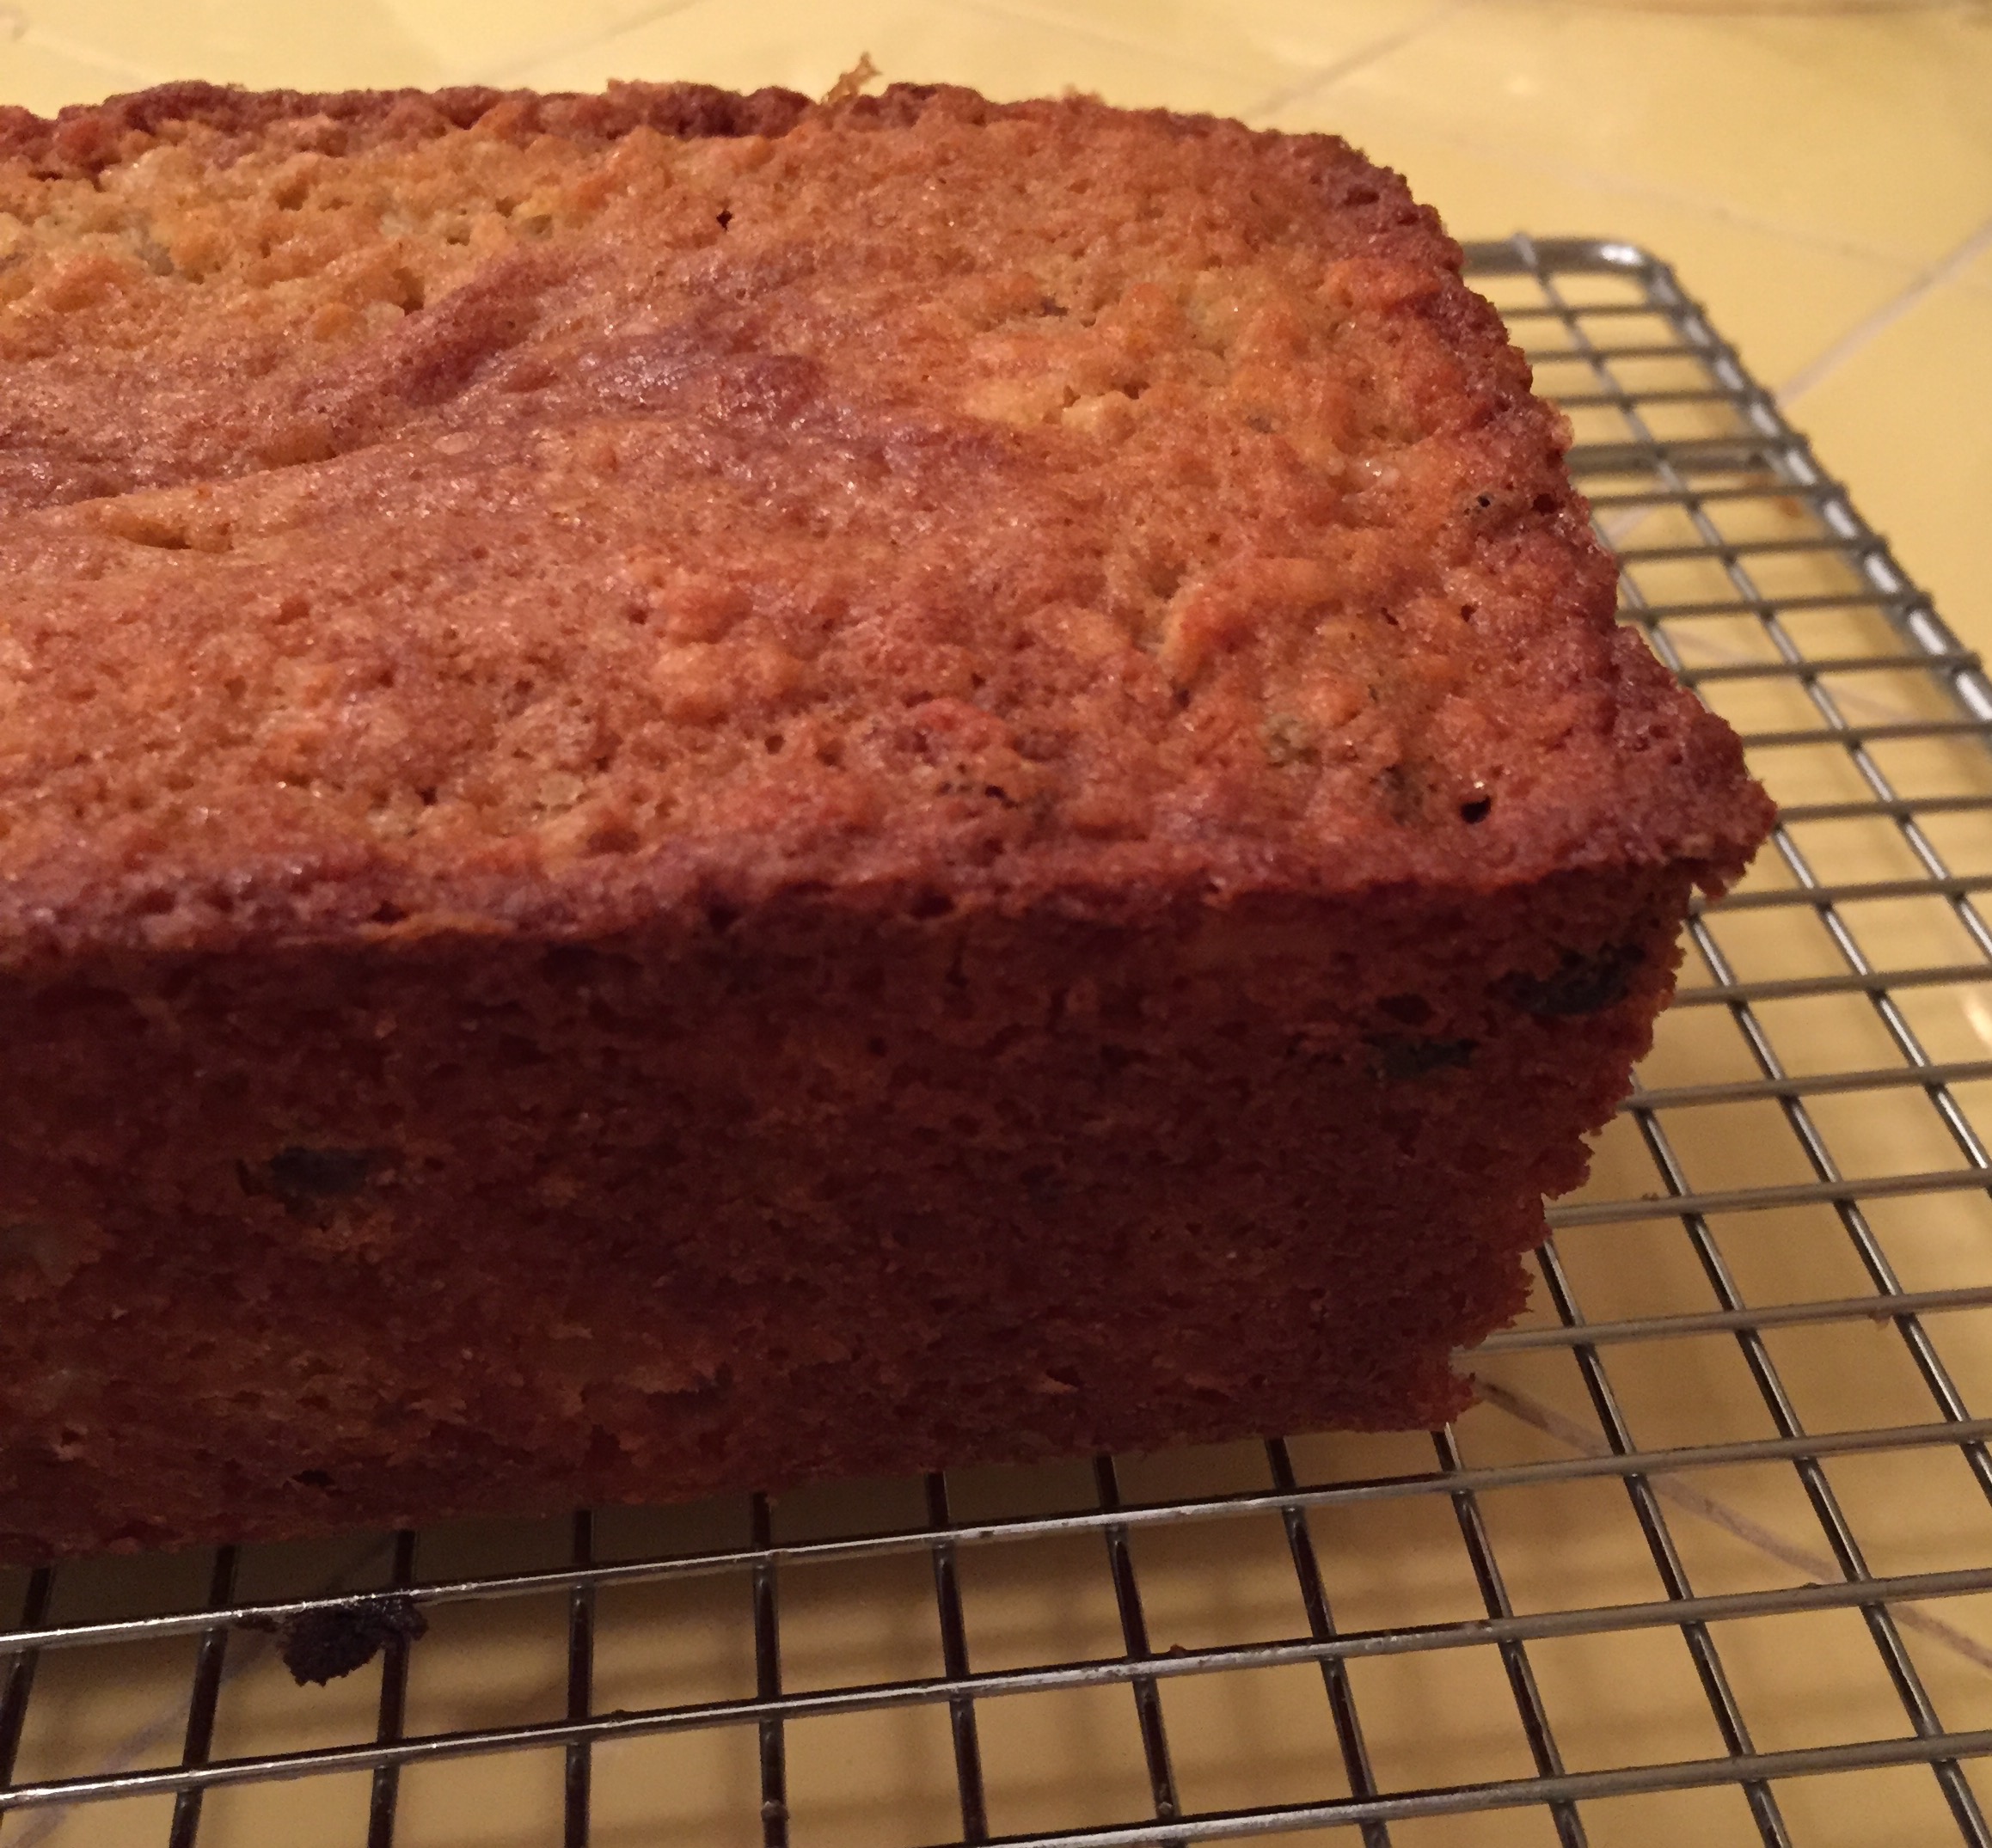
Cookies keep in an airtight container for a week. Yields 24 to 32 squares. I wasn’t able to roll my dough to the full 16.5 inches so I ended up with about 24 cookies.

These are insane.


Advertisement

Seven Days of Cookies: Mom’s Brown Butter Markka

Whew! We made it, a whole week of cookies! If you’re feeling like me, youIMG_3666 may never want to eat another cookie again! Until next year. Or next week. You know.

We’re closing the week with a cookie my mother made every year. It’s one she remembered her own mother making during the holidays, and those back-in-the-day Finns, they didn’t write anything down. You learned by doing and then you remembered. So no matter how often I asked mom to transcribe her memory, she never did. So what I offer you here is my memory of this recipe.

These call upon two of the baker’s primary abilities: Patience and faith. Patience because this dough is very touchy and the resulting cookies very delicate. And faith that the greasy looking glop you end up with will (will!) result in a delicious cookie.

BTW, “Markka” are Finnish coins no longer in circulation. But again, back in the day, we all would’ve known what these were. If we were Finns.

Notes

  • Patience throughout is key. Browning the butter, chilling the dough, shaping the cookies. Slow and easy.
  • Make sure your stove is set to medium heat for the butter browning and do stir constantly. 12 minutes will go by quickly. You may get
    IMG_3662

    Browned butter!

    some frothing that will cause you to wonder if you’re doing this correctly. You are. Keep stirring. The butter browns and releases that nutty fragrance at about minute 10 or 11. Wait for it, keep stirring, and pull it off the heat at 12 minutes. If you get anxious at any point, simply lift the pot off the heat for a few seconds, but keep stirring. You hear me on the stirring, yes?

  • Add the dry ingredients to the butter! It makes a difference! I don’t know why!
  • Once the dry ingredients are incorporated you will feel forlorn. What you have in the bowl is not dough, it’s hardly even batter. Faith, dear reader.
  • Forming the cookies. More patience. This is a good time to rewatch the 1995 BBC production of Pride and Prejudice. Because it takes some time to form these markka.

In the end, after all that work, you will have a scrumptious cookie. They IMG_3665are shortbread delicate so it’s best to store in a sturdy airtight container. (They don’t really ship well either.)

These are terrific with tea or a lovely little glass of sauternes.

Enjoy!


Mom’s Brown Butter Markka

Ingredients

1 scant cup unsalted butter (2 sticks), cut up

2 tsps vanilla

2 cups flour

1 tsp baking powder

1/2 c granulated sugar

1/2 tsp salt

Crystal sugar (for topping cookies)

Preparation

Line two large baking sheets with parchment and set aside.

Put butter in a 1.5 quart sauce pan. (Stainless steel is best because you want to be able to see the color of the butter as it browns.) Set the pan over medium heat and set your timer for 12 minutes. Start stirring. Keep stirring. The butter may foam up and start to look almost fluffy. Just keep stirring, it will settle down before you’re done.

Pour the browned butter into a large mixing bowl and set aside to cool while you assemble your dry ingredients.

Stir the flour in your storage container to aerate it and then measure 2 cups using the dip/sweep method. Add the baking powder, granulated sugar and salt, and whisk together gently.

Add the 2 teaspoons of vanilla to the browned butter. Then add half the dry ingredients to the butter. Stir gently to incorporate. Add the remaining dry ingredients and again, stir to incorporate.

So not pretty.

Scrape the dough into a smaller bowl, cover the top with a sheet of plastic wrap and chill in the fridge for two hours. Remove from the fridge and let stand at room temperature for about 20 minutes.

IMG_3664

You really will need to scrape.

Preheat the oven to 350. Position racks in the upper and lower third of the oven.

Use a small (#00) ice cream scoop to scrape up dough. It will shave and shard and that’s ok. Dump your scoopful of dough into your hand and warm it between your palms. Give it a minute and it will soften into a lovely, workable little ball of dough.

IMG_3663

To achieve this.

Roll it into a ball, flatten it slightly and place on the baking sheet. Repeat until you have 8 cookies per sheet. Sprinkle with the crystal sugar and press down on it a bit to make sure it sticks.

Bake for about 15 minutes until golden brown around the edges, rotating the sheets top to bottom halfway through.

IMG_3667

Et voila!

Let the cookies cool on the sheets for about 10 minutes before gently moving to racks to cool completely.

Yields about 24 cookies.


Seven Days of Cookies: Dark Chocolate Crinkles

When I first moved to LA back in the 90s, one of my favorite haunts was acookies bookstore on Third Street called The Cook’s Library. It was devoted entirely to cookbooks. It was heaven. I’d plunk myself down on the floor and lose myself for an afternoon reading about European pastry. The staff were always friendly and nice. It was heaven. It closed in 2009 after 20 years. I miss it.

One of the books I bought there was a sort of coffee table style book on European

cooks library

Photo: LA Times

chocolate recipes. I would tell you the name, even show you a picture, but alas, the book is packed into a box that’s packed into a storage locker. The first Chocolate Crinkles I ever made were from that book. They were plump and tasted like moist, delicious brownies. (The chocolate Bouchons served and sold at Bouchon Bakery are similar in taste/texture to the Euro Crinkle.)

Over the years I’ve tried a few other Crinkle recipes. None delivered the same tallish, rounded cookies. But I found that I prefer the flatter crunchy-chewy version. And the best recipe I’ve found is from Cook’s Illustrated.

Notes:

  • Follow the directions as written, mixing the ingredients gently but thoroughly (I use a hand mixer on low).
  • Spring for the good chocolate. (I use Valhrona natural cocoa and Scharffenberger unsweetened chocolate.)
  • Add the suggested espresso powder for incredibly deep flavor.
  • Don’t be afraid of the dough! It will be runny like a cake batter when you’re done mixing. Let it sit on the counter as directed. It will firm up but it will always be super soft. Handle with care!
  • Check your oven temperature for accuracy because you don’t want to bake these any longer than 12 minutes. There’s a fine line between chewy and underdone, I know. Trust the recipe and verify your oven temperature!
  • The recipe says to make two sheets of 11 rolled balls. I do not. I make three sheets: Two of 8 balls and one of 6 balls. It’s just how I do.
  • Use the ice cream scoop if you have one. It’s the easiest wayreindeer to handle the soft dough.

Not only are these cookies delicious, I think they are one of the prettiest holiday cookies. I love the bright white sugar against the dark surface cracks.

Enjoy!

Dark Chocolate Crinkles

Adapted from Cook’s Illustrated

Ingredients

1 c (5 ounces) flour

½ c (1 ½ ounces) unsweetened cocoa powder

1 tsp baking powder

¼ tsp baking soda

½ tsp salt

1 ½ c packed (10 ½ ounces) brown sugar (if weighing, no need to pack it)

3 large eggs

4 tsp instant espresso powder (optional)

1 tsp vanilla extract

4 ounces unsweetened chocolate, chopped

4 Tbs unsalted butter

½ c granulated sugar

½ c confectioners’ sugar

Preparation

Preheat oven to 325. Position rack in center of oven. Line three large baking sheets with parchment and set aside.

Whisk flour, cocoa, baking powder, baking soda, and salt together in bowl.

In a separate large bowl, combine brown sugar, eggs, vanilla and espresso powder (if using). Mix with a hand mixer on low until well combined.

Put chopped chocolate and butter in a heatproof glass measure and microwave at 50 percent power, stirring every 30 seconds until melted.

Add melted chocolate to the egg mixture. Mix on low speed until combined.

Add flour mixture in two additions, mixing on low until just combined (no dry streaks remain). The dough will be wet and runny, like a brownie batter.

Let dough sit at room temperature for 10 minutes.

dough ballsPlace granulated sugar and confectioners’ sugar in separate shallow dishes. Working with 2 tablespoons dough (or use #30 scoop), roll into balls. Because the dough is so soft make your balls by gently tossing the dough back and forth in your hands. Immediately drop the dough balls into the granulated sugar and gently roll to coat. Transfer dough balls to confectioners’ sugar and roll gently to coat evenly.

Place 8 dough balls, evenly spaced, on two of the prepared sheets, and 6 on the third sheet.

Bake cookies, one sheet at a time, until puffed and cracked and edges haveIMG_3642 begun to set but centers are still soft (cookies will look raw between cracks and seem underdone), about 12 minutes, rotating sheet halfway through baking.

Let cool completely on sheet before serving. Yield 22 cookies.

These are best the day they’re made, but can be kept in an airtight container for about 3 days.

Seven Days of Cookies: Chocolate Molasses Buttons

OK, I’m veering from my original plan of only tried and true recipes to closeupinclude this one which I just discovered: Chocolate Molasses Buttons. These are a variation on the traditional molasses crinkle through the addition of cocoa and a chocolate ganache to dress them up. The cookie is crisp-chewy and the flavor is addictive. The molasses comes through clearly here, so if it’s not a favorite, I suggest you go with a traditional molasses crinkle using the best recipe I’ve found.

Also newly discovered this year is delicious. magazine out of the UK. Not sure how I stumbled across it, but their FB feed is fantastic, full of recipes and gorgeous photos. I’ve adapted this cookie recipe from their site, converting the measurements from metric to American Standard. Full disclosure: I weighed my ingredients (setting the scale to grams). If you’d like to do the same, the original recipe is here.

Enjoy!

Chocolate Molasses Buttons

Adapted from delicious. magazine.

Ingredients

1 c plus two tablespoons flour

1/4 c natural cocoa powder

¾ tsp ground cinnamon

½ tsp ground ginger

¼ tsp ground allspice

¾ tsp baking soda

½ tsp fine sea salt

10 tablespoons unsalted butter, softened

3/4 c brown sugar, packed

1 tsp vanilla extract

1 large egg

1/3 c scant, unsulphured molasses (such as Grandma’s)

Crystal sugar for rolling

For the chocolate filling;

1/4 c, generous, dark chocolate, chopped

2 Tbs unsalted butter, cut into small pieces

½ tsp unsulphured molasses (such as Grandma’s)

Preparation

For the dough,  in a medium bowl, sift together the flour, cocoa powder, cinnamon, ginger, allspice, baking soda and salt. Set aside. Line two large baking sheets with parchment, set aside.

In the bowl of an electric mixer (or a large bowl if using a hand mixer), combine the butter, brown sugar and vanilla. Beat with on medium-high for about 4 minutes or until the mixture transforms from a dark gritty mixture, to a smooth, noticeably lighter color. Beat in the egg. Beat in the molasses until blended.

Reduce the mixer speed to low and gradually add the dry ingredients, mixing until fully incorporated. Scrape dough into a medium bowl, cover with plastic wrap and chill for about  2 hours.

Preheat the oven to 350 and position racks in the upper and lower thirds of the oven.

snowPour the crystal sugar into a shallow dish. Using a small ice cream scoop with a capacity of about a tablespoon, portion the dough into balls. Roll the dough balls in the crystal sugar, coating each one completely. Even space 12 of balls on each prepared baking sheet, spacing evenly.

Bake the cookies for 10 minutes or until they are set at the edges but still very soft in the centre.

Quickly pull the baking sheets from the oven to retain the heat then, using the handle of a wooden spoon, make a deep, fairly wide indentation in the center of each cookie. Return to the oven for 5 minutes more. If the indentations have become shallow, press down again with the wooden spoon handle. Cool cookies on racks.

To make the filling, melt the chocolate and the butter in a heatproof glass measuringIMG_3617 cup. Melt in the microwave on low in 30 second bursts, stirring well after each interval. Stir in the molasses. Transfer the ganache to a small Ziploc bag or disposable piping bag  (I use a small sandwich bag draped into a drinking glass) and work it toward the corner. When ready to fill the cookies, snip off a tiny bit at the corner and fill the indent of each cooled cookie. Let sit at room temperature for about 1 hour or until the ganache is firm.

Yields aboutchocmol 24 cookies.

Note: My cookies came out flatter than the rounded version in the photo on the delicious site (which look like traditional chubby thumbprints). The taste, however, is exceptional.

Seven Days of Cookies: Lemon Almond Shards

Lemon is not your typical holiday flavor but I love these cookies during theDSC00551 holidays. The bright freshness of the lemon and the super crunch is refreshing amidst the heavier, spicier seasonal sweets.

I pulled the recipe card for these from a Martha Stewart Living magazine while at the salon a few years ago. I’ve been making them year round ever since. If you can get hold of some backyard lemons (or farmers market), it makes a difference. I think these are pretty special.

Lemon Almond Shards

From Martha Stewart Living

Ingredients

3/4 c flour

3/4 c fine ground yellow cornmeal

1 tsp anise seeds

1/4 tsp baking powder

1/4 tsp salt

3 Tbs unsalted butter, room temperature

1/2 c sugar

1 large egg

2 teaspoons finely grated lemon zest

1 large egg white, lightly beaten for egg wash

2 tablespoons sliced almonds

Crystal sugar

Preparation

Preheat oven to 350. Line a large baking sheet with parchment paper and set aside.

Gently crush the anise seeds a bit before whisking together with the flour, cornmeal, baking powder and salt in a medium bowl. Set aside.

Beat butter and 1/2 cup sugar on medium speed until light and fluffy. Beat in whole egg and lemon zest. Reduce speed and beat in flour mixture.

DSC00552Press dough into an even 1/4-inch thickness on prepared baking sheet. Brush with egg white; sprinkle with almonds and crystal sugar.

Bake until golden, 22 to 25 minutes. Let cool on a wire rack. Break into pieces.

Seven Days of Cookies: Almond Raspberry Thumbprints

I love a jam thumbprint, especially when the cookie has been baked with the jam – it getsIMG_3609 all chewy and delicious. There are a zillion thumbprint recipes but this one, adapted from Martha Stewart, is especially good.

Martha’s original version calls for hazelnuts and strawberry jam. I prefer the Linzer flavors of almonds and raspberries. I don’t toast my almonds beforehand because I feel they get toasted enough in the baking. You certainly can if you like.

As to jam, the best raspberry jam you can find is what you want here. (And make sure it’s jam vs. preserves. You don’t want big chunks of fruit in your filling.)

The cookies are rich. The recipe makes only 2 dozen, but on a cookie tray, that’s more than enough.

Enjoy!

Almond Raspberry Thumbprints

Adapted from Martha Stewart

Ingredients

1/2 c (1 stick) unsalted butter, softened (soft but sill ccol)

1/2 c plus 2 tablespoons sugar, divided

1 large egg, separated, each part lightly beaten in separate small bowls

1 tsp vanilla extract

1/8 tsp almond extract (optional)

1 1/4 c flour

1/8 tsp salt

1/2 c slivered almonds, finely chopped (not powder fine)

Raspberry jam for filling

Preparation

Preheat oven to 350. Line two large baking sheets with parchment and set aside.
Cream butter and 1/2 cup sugar with an electric mixer on medium speed until light and fluffy. Add egg yolk, vanilla and almond extract (if using), and mix well. Reduce speed to low. Add flour and salt, and mix until just combined. Shape into a ball, flatten it slightly, cover in plastic wrap and chill for two hours.

Remove chilled dough from refrigerator and let sit for about 20 minutes.

IMG_3594Stir together chopped almonds and the 2 tablespoons of sugar in a small bowl. Set up a production line of your bowl of egg white, the nuts, and your prepared baking sheets. Using a small ice cream scoop (1-inch), scoop level amounts of dough and roll into balls. Dip balls into the egg white and then into the almond-sugar mixture.  Space 1 inch apart on prepared baking sheets.

Using the end of a wooden spoon or small pestle, press down the center of each ball. Make a fairly deep crater but don’t push through to the baking sheet. Fill each crater with a 1/4 teaspoon ofIMG_3606 raspberry jam.

Bake for 16 minutes until golden brown. Cool on racks.

Cookies keep 2-3 days in an airtight container.

Seven Days of Cookies: Peppermint Sugar Cookies

Peppermint is the flavor of the holidays, showing up in bark, hotIMG_3600 chocolate, cakes and the ubiquitous candy cane. There’s nothing more cheerful than a candy cane but many of us, after the age of 13, like looking at them more than eating them. I don’t know, hard candies and sugar sticks – it’s tough to keep the dentist out of my head.

This cookie gives you what you love about candy canes without the tooth-aching sweetness and guilt. Plus they’re pretty on the plate. And terrific with hot cocoa.

I have a handwritten version of this recipe so can’t credit it, but if I had to guess, it’s another Bon Appetit treat (although it doesn’t come up in an Epicurious search.)

Enjoy!

Peppermint Sugar Cookies

Ingredients

2 1/2 c flour
1 tsp baking powder
1/4 tsp salt
1 c (2 sticks) unsalted butter, at room temperature
3/4 c powdered sugar
1 large egg yolk
2 large egg whites
1/2 tsp peppermint extract
1 c hard peppermint candies or candy canes, crushed powder fine (about 6 oz), divided
3-5 oz bittersweet chocolate, melted

Preparation

Line 2 large baking sheets with parchment and set aside.

Sift together dry ingredients.

IMG_3593In a large bowl, beat butter and powdered sugar with an electric mixer until fluffy. Add egg yolk and beat until blended. Add egg whites and extract, and mix well. The mixure will look grainy, don’t be alarmed. Gradually beat in dry ingredients. Stir in 1/2 c crushed candies.

Gather dough into a ball, flatten it slightly, wrap in plastic and chill for about an hour.

Preheat oven to 350°F. Position rack in middle of oven.

Using a small (or one-inch) ice cream scoop, scoop blobs of dough and dip rounded tops into remaining crushed candies. Place two inches apart on prepared baking sheets. Bake for 12-14 minutes until lightly browned on bottom. Transfer to racks to cool completely.

Melt chocolate and, using a small offset spatula, spread melted chocolate on the bottom of each cookie. Place cookies,  bottoms up, on racks until chocolate sets.

IMG_3599The recipe yields about 4 dozen cookies. The dough freezes well so you can make mini batches throughout the holidays. Just let it defrost in the fridge for several hours before using. (PS, I’ve never tried this, but I imagine you could scoop all the dough, dip the tops in the crushed candy and THEN freeze the dough balls. Give it a try!)


Seven Days of Cookies: Cherry Pistachio Mexican Wedding Cakes

One of the best parts of the holidays for me (as you might imagine) are theIMG_3589 copy cookies. I love to make them, give them, exchange them, receive them. Over the years, I’ve narrowed my personal baking selection down to a handful of exceptional, easy to make recipes. These are cookies that turn out great every time and each is a showstopper in terms of taste, texture, and beauty. Each also stands up to freezing, shipping and storing.

For the next week, I’ll share a cookie recipe every day so that by Sunday you’ll have everything you need to have the most delicious cookie tray ever.

Enjoy!

Cherry Pistachio Mexican Wedding Cakes

This recipe is adapted from Epicurious. I’ve been making these every year since I saw them in the December 2006 Bon Appetit. They are light, delicious, and wonderful to give. Make sure your butter is soft but not warm, and do sift your flours. You don’t want anything to weigh these babies down. Also, note, if you ever wondered what making cookies was like in the olden times, this is the recipe to work with: Mixing in the 5 cups of flour by hand is a bit of work, but like with scones and shortbread, the warmth of your hands does something magical to the dough. Just go slowly and be patient, the results are well worth it. PS, this is why you should use a very large bowl.

I use a rectangular 1 Tablespoon measure when forming the cookies, the results are more consistent. The original recipe says it yields 80 cookies. I reliably get about 60.

Ingredients

2 c (4 sticks) unsalted butter, room temperature

1 c powdered sugar plus more for coating

2 Tbs vanilla extract

1 tsp salt

1 c shelled unsalted natural pistachios (about 4 ounces), chopped (I use Trader Joe’s dry roasted, unsalted pistachios)

1 c dried tart cherries or dried cranberries (again, Trader Joe’s)

3 1/3 c sifted cake flour

1 2/3 c sifted all purpose flour

Preparation

Preheat oven to 350°F. Arrange racks on the top and middle of the oven. Line two large baking sheets with Silpat or parchment. Set aside.

Beat butter and 1 cup powdered sugar in large bowl until light and fluffy. Beat in vanilla and salt, then pistachios and cherries. Dump in the flours and, usUntitleding your hands, carefully work the flour into the butter mixture. Be gentle, you don’t want to overmix the dough.

Using a rectangular 1 Tbs measure (or a generous round tablespoon), scoop dough and then roll in your hands into rough football-shaped ovals. Place on prepared sheets, spacing 1 inch apart. Bake cookies, rotating sheets halfway through, until bottoms just begin to color, about 16 minutes. Cool cookies on sheets 10 minutes before coating.

powderPour generous amount of powdered sugar into medium bowl. Working with 5 or 6 warm cookies at a time, add cookies to bowl of sugar; gently turn to coat thickly. Transfer cookies to rack to cool completely.

Can be made 4 days ahead. Store airtight at room temperature. (I store mine in single layers in 1 Gallon Ziploc bags.)

Peaceful Peppermint Bark

The holidays bring a lot with them. A Santa sackful of stress and fun byIMG_3536 turns. They always seem to catch us off guard and we’re out of time before we even realize it’s December. Finding moments of calm and peace among all the merry mayhem is the biggest challenge of the season. For many years, my moments came with a Starbucks soy latte and one of the individual squares of peppermint bark they sold at the register. I’d sit in my car, preferably on a quiet side street, and silently enjoy my coffee and treat. It helped.

I no longer drink coffee but peppermint bark is still my number one favorite holiday treat. I used to buy it from Williams Sonoma, but a few years ago I tried making it. It’s so easy! Yet even knowing that, I continued to buy it. This year, though, when this charming video popped on my FB feed of Bouchon Bakery elves making their bark, it inspired me. I got out the hammer and the peppermint.

So this is my prescription for this hectic holiday weekend: Get your kids, your partner, or yourself into the kitchen and make Peaceful Peppermint Bark. It’s a treat that delivers on many levels:

  • Stress-relieving benefits of the peppermint
  • Endorphin-releasing pleasure from the chocolate
  • Full-on “take that!” energy release from bashing the candies

Plus, it’s takes only about an hour start to finish so it really isIMG_3533 perfect to make with kids. And it gets you back out into the merrymaking maelstrom in no time. Added bonus: You can give it as gifts!!

A word on the peppermint candy: Candy canes are fine. I’ve always used Starlight Mints which seem to be difficult to find these days. IMG_3538When I was a kid there were stands in every grocery store for Brach’s Pick-A-Mix. You filled a bag with an assortment of individually wrapped candies and paid by weight. (Each had a fairly stern “NO SAMPLING” sign, but we always did.) Apparently, such stands are no more. In the candy aisle I often find Brach’s butterscotch discs, but no mints. This year, I went to a few stores before finding Kroeger brand at Ralph’s. I’m sure there are differences in taste across brands, but really – just use what you can easily find.

The recipe is a common one – its also the easiest. As with all recipes, use the best chocolate you can find, especially the white chocolate. You want to read the label and make sure it includes cocoa butter. Don’t use white chocolate chips because they won’t melt or adhere well. Also avoid any IMG_3528white chocolate branded as “confectionary.” It’s sickly sweet, doesn’t melt well and is just a waste of your time. (Want to know more about white chocolate? Here’s a terrific post by Serious Eats.)

I use a combination of Valhrona 64% and Valhrona 72% (the bars you can get at Trader Joes) for the dark chocolate, and either Valhrona or Lindt white chocolate. (I get the white Valhrona in blocks at a specialty store, but Lindt bars are readily available in supermarkets.) You can use 6 oz of any dark or semisweet chocolate you like.

Tips

  • You don’t need a hammer, you can use any 15 oz can of something, but the hammer is faster and more satisfying. Just make sure you put the bag of candies on a wooden cutting board – don’t smash on your tile, marble, granite, etc. counters.
  • Melting dark chocolate: I don’t use a double boiler when melting chocolate. I have a low wattage mini microwave which works perfectly for dark chocolate.
  • Melting white chocolate: White chocolate is delicate and burns easily! I use a small, nonstick saucepan and melt the white chocolate over low heat, watching and stirring until just melted. Beware any incidental moisture! Steam or water, even a droplet, will cause your white chocolate to seize into a pasty goo!
  • Peppermint extract is optional. I like a little zing in my dark chocolate.


Peaceful Peppermint Bark

Ingredients

3 oz 64% cacao dark chocolate, coarsely chopped

3 oz 72% cacao dark chocolate, coarsely chopped

1/4 tsp pure peppermint extract (optional)

2 tsps canola oil, divided

6 oz white chocolate, coarsely chopped

1/2 c crushed peppermint candies

Preparation
Line the bottom and sides of an 8 inch square baking pan with parchment, creating an overhang on two sides.

Put about 20 Starlight Mints (or other peppermint candies) into a Ziploc bag on a wood cutting board. Bash moderately with a hammer until you have a small crushed pieces. You don’t want a powder, nor do you want any big chunks. Think 1/8-inch dice. Bash until you have ½ cup.

Scatter abarkbout half the crushed candy across the bottom on the prepared pan. Set aside.

Melt the dark chocolate in a heatproof measure in the microwave on low, stopping and stirring every 15 seconds until just melted. Stir in 1 tsp of canola oil and peppermint extract if using. Pour over the crushed candy in the prepared pan, smoothly gently with an offset spatula. Place in the refrigerator to set, about 20 minutes.

Put the white chocolate into a small saucepan (preferably nonstick) and, over low heat, stir gently until just melted. Stir in 1 tsp canola oil. Pour the melted white chocolate over the set dark chocolate, spreading gently with an offset spatula to cover.

IMG_3531Immediately scatter the remaining crushed candies (to taste) over the top of the white chocolate, pressing gently with spatula. Set in the fridge for another 20-30 minutes until set.

Heat the blade of a small, sharp knife over a gas burner ( or in a glass of boiling water, wiping it dry before using), and run the blade along the sides of the bark in the pan that aren’t covered by parchment. Use the parchment overhangs to gently lift the bark from the pan.

From here you can cut or break the bark into pieces. If cutting, heat the blade of a long knife before making each cut to ensure smooth sides. You’ll get 20-30 pieces depending on size.

Enjoy!

Full disclosure: I wasn’t paying attention this go round and made two big mistakes…. My white chocolate seized and I didn’t have any more of it, so I spread the paste in the prepared pan set over low heat on the stove, and then put it in the fridge to set. Because of this, I forgot to add the canola oil to the white chocolate. Therefore, my layers separate, as is obvious in the pictures. I wanted to get this post up for the weekend, so didn’t run out for additional chocolate to make a picture perfect batch. I’m so ashamed.


Bread is Life Quick Bread

Friends, Paris. What can I add to the conversation about what happened last Friday?

"Peace for Paris" by Jean Jullien

“Peace for Paris” by Jean Jullien

I’m devastated and so very sad. Paris is one of my happy places. I’ve always felt safe there. Safe and happy. I’m heartbroken for the city and her people, for France and its citizenry, as they, like the rest of us, try to understand this very complicated world.

One of the bakers I follow on Facebook, Painrisien, posted a lovely sentiment on Saturday morning – that the boulangeries were open, even in the affected areas, and that the bakers were plying their centuries-old trade because life continues and bread is life.

DSC00064 I closed my laptop then and set aside my phone. I went to my kitchen, another of my happy places, and took down the flour and sugar, pulled out the butter. Baking is my security blanket when the world gets crazy. I love the alchemy and the physicality, I love knowing that ingredients, mixed in the right proportions, will always become bread. Reflexively, I began making Pulla, my mom’s Finnish bread. I wanted the familiarity of baking by heart, the homey fragrances of wDSC00220arm milk and cardamom, and the work of kneading the dough. Kneading bread, feeling it transform beneath my hands, gives me a soothing sense of control. Once the Pulla was set aside to proof, I washed the dishes and scrubbed the counters. I cleaned the stove and the floors. And it wasn’t enough. I needed more.

I scanned the cupboards and counters: There was the last of the candied orange peel, the rest of the chopped dried cherries/apricots/peaches from last week’s apple pie, a handful of dried cranberries. There was an apple in the bowl, an orange in the fridge. There was a dollop of creme fraiche and the last of a container of buttermilk.

I shredded the apple and zested the orange. I mixed all the dried fruit together. Flour, sugar in a bowl.IMG_2986 Eggs, crème fraiche, buttermilk whisked together with vanilla and a couple of spices. I combined it all and made what has to be said, is the most delicious quick bread I have ever had. Ever, no lie.

It never fails. The joy, the pleasure, the magic of baking – it brings me back from the brink every time.

Bread is life. Make the bread.


Dried Fruit Quick Bread

Set the oven to 350F. Butter a 9×5-inch loaf pan and line the bottom with parchment.IMG_3148 Set aside.

Ingredients

1 cup shredded apple, juice squeezed out

1 ¾ c chopped dried fruit – I used cranberries, cherries, apricots, peaches, and candied orange peel

1 ¼ c flour

¾ c sugar

1 tsp baking powder

1 tsp salt

½ tsp baking soda

½ tsp cinnamon

¼ tsp nutmeg

1 tsp – 1 Tbs orange zest, to taste

2 large eggs, lightly beaten

½ c melted butter, cooled

¼ c crème fraiche

¼ cup buttermilk

1 tsp vanilla

Preparation

Whisk together dry ingredients in a large bowl. Add dried fruit and stir to distribute evenly. Make a well in the middle.

Whisk together eggs, crème fraiche, melted butter, buttermilk and vanilla, and pour into the well in the dry ingredients. Stir with wooden spoon until well combined. The batter will be thick and sticky.

Scrape the batter into the prepared pan and smooth the top. Bake for about an hour, checking at 50 minutes. A tester inserted in the middle should come out clean. Cool in IMG_3146pan on a rack for about 10 minutes. Remove from pan, peel off parchment, and let cool to a warm room temperature. Wonderful with butter, or toasted with a little jam.

Enjoy.

And remember: If we stay away, if we become too afraid to go to Paris (or anywhere else our heart desires), the darkness wins. Which can’t happen, not in the City of Light, not anywhere. Blessings.