Seven Days of Cookies: Cacao Nib Meringues a la Tartine

Tartine. The storied bake shop in San Francisco. Everyone has a Tartine story, almostimg_7759 all begin with the length of the line and include a remark on the size of their gougeres (softball). Even my own review includes both.

During my just under three-year-stint living in the Bay Area, I only visited Tartine the one time. I lived in Oakland and there were so many cakes to see and pastries to try. But their Cacao Nib Rocher is a sweet for the ages. Unforgettable. A mini-Matterhorn of vanilla scented meringue studded with cacao nibs. Such simple ingredients, it’s hard to imagine just why these are so spectacular. But they are.

tartine-rocher

The original from Tartine

As it happens, I own the Tartine cookbook. It includes a Rocher recipe but for their Almond version. However, since I am Nib obsessed, I decided to adapt the almond recipe to see if I could approximate the deliciousness of the originals.

Turns out, I could! Almost: I used to help my mom make meringues for some 1970s showstopper of a dessert so I used her  instructions (a holiday nostalgia moment), which call for three egg whites, cornstarch, and granulated sugar. (Tartine’s Almond Rocher recipe calls for 2 egg whites and powdered sugar.) And yes, both recipes call for one cup of sugar. Friends, I just can’t. So I reduced to 3/4 cup and these are plenty sweet. They are crunchy on the outside and a bit marshmallowy on the inside. These are perfectly lovely for the holidays what with their snow white color and dark specks.

The meringues are delicious on their own, but I suggest balancing the sweetness by serving two on a plate with a small puddle of bitter orange marmalade (warmed and strained) to round out the flavor.

Cacao Nib Meringues a la Tartine

Adapted from the Tartine Cookbook

Ingredients

Whites from 3 large eggs (about 1/2 cup), room temperature

¼ tsp cream of tartar

Pinch of salt

3/4 tsp  vanilla

1 Tbs cornstarch

3/4 c granulated sugar

½ cup cocoa nibs (I use Valrhona)

Preparation

Preheat oven to 250° F. Line two baking sheets with parchment.

Whisk the cornstarch into the sugar in a small bowl.  Set aside.

Fit your mixer with the whisk attachment and combine the egg whites, cream of tartar, and salt in the bowl. Starting at low speed and gradually increasing to medium, whip until soft frothy peaks form.img_7755

Increase the speed to medium-high and gradually add the sugar/cornstarch mixture. Continue to beat until stiff peaks form when the whisk is lifted. Add the vanilla.

Continue beating until the mixture is glossy and very thick. Remove the bowl and, using a rubber spatula, gently fold in the cocoa nibs.

Using a #40 ice cream scoop, drop dollops of meringue on the prepared img_7756-copybaking sheets. You should get about 10 on each sheet. Use a small spoon to drop any remaining meringue on the tops of  the dollops on the sheet.

Bake for about 30-45 minutes, rotating and switching the sheets halfway through, until the meringues are crisp, dry to the touch on the outside (not sticky at all), and still white. When done, let cool on the pan on wire racks for 20 minutes or until completely cool.

Serve plain, or with two on a dessert plate alongside a teaspoon of bitter orange marmalade (1/4 cup heated in the microwave and strained).

Enjoy!


Advertisement

Seven Days of Cookies: Cornmeal Fruit Biscotti

img_7733Here’s a thought. Make holiday cookies in September and take all photos. Then simply post, post, post in December.

Anyway, just in time for an afternoon break, these wonderful Cornmeal and Dried Fruit Biscotti from Alice Medrich are just waiting for a sip of Vin Santo.

The genius here is the addition of crushed aniseed. The licorice aroma might scare you at first, but steady on. It perfumes the cookies beautifully and is especially nice with the dried cranberries and apricots.

I love cornmeal-based sweets, both cakes and cookies. These do not disappoint. It took willpower not to tinker and add some orange  (because I love cranberry and orange so much), but Alice is a master of distinct flavor notes. Girlfriend does not need my help.

These cookies can be fragile so use a sharp serrated knife when cutting the baked loaf.

Cornmeal and Fruit Biscotti

Adapted from a recipe by Alice Medrich, Chewy Gooey Crispy Crunchy Melt-in-Your-Mouth Cookies

Makes about 30

Ingredients

1 c plus 2 Tbs (5 oz) all-purpose flour

1 c  (5.375 oz) cornmeal (I used white)

½ tsp baking powder

¼ tsp salt

4 Tbs unsalted butter, softened

1 c (7 oz) white sugar

2 large eggs

1 tsp vanilla

1 tsp finely grated lemon zest

1 Tbs aniseed, crushed

½ c  coarsely chopped dried cranberries

½ c  chopped dried apricots

1 c toasted, coarsely chopped almonds*

Preparation

Preheat oven to 350 degrees.

img_7722Line a large rimmed baking sheet with parchment and set aside.

Whisk the flour, cornmeal, baking powder and salt to blend.

Add flour mixture, mixing  until moistened. Mix in dried fruit and nuts.

Turn the dough out onto the parchment lined baking sheet, and with damp hands, pat and squish the dough into a 12-inch by 2-inch log. Usloafse a spatula or bench scraper to clean up any bits of dough clinging to the parchment around the log. (See pic at right: Pretty loaf on marble – no way to move that sticky baby to the pan. Use the parchment.)

Bake on the center oven rack for 35-40 minutes, rotating pan halfway through, until lightly browned and cracked on top. Cool on the cookie sheet on a rack for at least 15 minutes.

Slide the parchment onto a cutting surface. Use a long serrated knife to cut the loaf on a diagonal into slices about 3/8-inches wide. (If the loaf is too crumbly to cut, let cool completely.)

img_7730Transfer slices to cookie sheet, standing them ½ inch apart. Bake 15-20 minutes, until barely beginning to brown. Cool on rack. Once completely cooled, can be stored airtight for about two weeks.

Note: I cut my biscotti slices in half to increase my yield and, because, I don’t really like a long stick of biscotti.

Enjoy!


Seven Days of Cookies: Mast Bros. x 2

I’ve long loved the Mast Brothers Chocolate cookbook. It’s lovely to look at and full of img_7704amusing, literary anecdotes. The photos are dark and mysterious, the preparation guidelines have an insider’s vagueness, the cover is a glorious matte paper that evokes the 1940s.

In other words, these are speakeasy recipes. Best enjoyed with a bourbon-based artisanal cocktail in a booklined room, seated on a burnished leather Chesterfield that someone found in an alley. This is hipster baking. And I mean that in the very best way.

And, as I am with most things hipster, I’ve been slightly intimidated by the Masts. But I stepped up, making two recipes: Chocolate, Maple & Pecan Cookies and a variation on their Peanut Nib Brittle. (The brittle makes up for the non-cookbook Panforte from yesterday.)

Both are terrific. The maple sugar in the cookies is inspired. But both are true to their Brooklyn roots: These are treelight and firelight sweets, late night on Christmas Eve. Don’t forget the iced bourbon.

(By the way, the lovely plate is by Josie Jurczenia Clay, Berkeley, CA.)

Chocolate, Maple & Pecan Cookies

Adapted from Mast Brothers Chocolate, yield about 24 cookies

Ingredients

½ c pecans

1 c (2 sticks) unsalted butter, room temperature

1 ¾ c maple sugar

2 large eggs

1 ¼ c flour

1 Tbs baking powder

1 tsp baking soda

1 tsp sea salt

10 oz dark chocolate chips (I use Guittard semisweet)

Preparation

Preheat oven to 350.

Toast pecans on a silpat-lined baking sheet for 10 minutes. Cool and coarsely chop.

img_7710Cream butter and maple sugar in a medium bowl until fluffy. Add eggs, one at a time, mixing thoroughly after each addition.

Whisk together the flour, baking powder, baking soda, and sea salt. Add to the butter/sugar mixture in two additions, beating until combined after each.

Stir in the pecans and chocolate chips.

Cover the bowl with plastic wrap and chill for 30 minutes.

Use a #40 ice cream scoop to form balls, placed two-inches apart on baking sheets. (I lined with parchment.)

Bake for 15 minutes. Cool one minute on baking sheet before moving to racks to cool completely.

Notes: These exceptionally delicious cookies came out flat, despite the baking powder and the chilling. I live in Los Angeles where maple sugar is a costly ingredient. I used the entire 8.8oz, $12 package from Whole Foods for these. I have since ordered a 48 oz tub of maple sugar from Amazon.

Almond Nib Brittle

Adapted from Mast Brothers Chocolate, yields 2 lbs.

The original recipe calls for peanuts. I don’t care for peanuts so I made this with an equal measure of toasted almonds.

Ingredients

2c granulated white sugar

½ c water

½ c honey

½ c cacao nibs (I use Valhrona)

½ c toasted and coarsely chopped almonds

2 Tbs unsalted butter

1 tsp baking soda

1 tsp sea salt

Preparation

Arrange a silpat or waxed paper lined, rimmed baking sheet near the stove, along with the nuts and nibs, baking soda, and butter.

Combine sugar, water, and honey in a 1.5 quart saucepan. Bring to a simmer and withoutimg_7709 stirring, cook until golden brown. (I get nervous around boiling sugar and color instructions. I clipped on a candy thermometer and let it go to 300F.)

Remove from heat and quickly add the butter, baking soda, nuts and nibs. Stir until the butter is melted. Pour onto the prepared baking sheet and sprinkle with salt.

When cool, break into pieces.

Notes: This is fantastic.The honey notes come through strong in this brittle so be sure to use a great honey whose flavor you enjoy straight from the jar.

Enjoy!

Seven Days of Cookies: Panforte de Lebovitz

Hello, holiday baking! This year, Seven Days of Cookies focuses on recipes that I’ve never madeimg_7685 before. Last year was favorites, this year it’s newbies. (And though I do indeed own Dorie’s Cookies, I haven’t cracked it for this adventure.)

If you’re like me, you follow David Lebovitz (sweets + Paris makes him a must) across social media. He recently shared an article that said Americans are buying more cookbooks, but cooking less often. Um. Yeah. I have a cookbook library but actively use only a few volumes. I like reading the books, imagining the food, and then storing them away. The sheer number of

img_2886

A selection of my library.

cookbooks makes me so happy. So, even though I’d already decided to make only new-to-me recipes this year, I also decided to use my own cookbooks! (Sorry, Epicurious.)

Ok, well, that’s a teensy lie, but I’ll make up for it later in the week. Because the first treat this year is adapted from David Lebovitz: Panforte. I’ve never eaten panforte. In shops it always looks like nougat or halvah, neither of which I enjoy. Or super honey flavored or treacly. I also assumed back-breaking complexity. All of it.

Well, not David’s recipe! Super easy, few ingredients, fewer steps, and darn delicious. And, I have to add, impressive because it still looks like a hard duty enterprise. Impress yourself and then your friends and family.

This is first up because, as David points out, it can sit for weeks on your counter with no ill effect. The original recipe calls for candied fruit, such as citron. I have a box of beautiful fresh candied orange peel in the cupboard but I’m saving it. Not sure for what. So I used dried cherries for the fruit and pistachios for the nuts. Fantastico.

A few notes: I tried several times but I could not get 5 level tablespoons of cocoa powder to weigh 40g. I changed the battery in my scale, weighed other items of known weight….and ended up going with weight vs. measure. The result is nicely chocolately. The red chile pepper has gotten mixed reviews: Some people like the bite, others do not. I’m waiting to see if it mellows over a week. Lastly, the package of pistachios I used was a bit underweight so I made up the difference in almonds.

Panforte de Lebovitz

Adapted from a recipe by David Lebovitz

Makes one 9″ cake

Ingredients

5 Tbs (40g) unsweetened cocoa powder (Dutch-process or natural)

2 ½ c (325g) pistachios (shelled and unsalted)

¾ c (110g) flour

1 c (200g) dried cherries (coarsely chopped)

1 Tbs ground cinnamon

2 tsps ground ginger

1 ½ tsps fresh ground black pepper

Pinch of grated nutmeg

½  tsp red chile powder

3 oz (85g) bittersweet or semisweet chocolate, chopped

1 c (200g) granulated white sugar

¾ c (210g) honey

extra cocoa powder, for dusting the pan

powdered sugar, for dusting the panforte

Preparation

Preheat the oven to 350F

Spray a 9 to 10-inch springform pan with nonstick spray. Dust the inside with cocoa powder, making sure to get it up the sides. Line the bottom with a round of parchment paper.

Spread the pistachios on a silpat-lined baking sheet and toast for 10 minutes. Remove from the oven and let cool.

Reduce oven temperature to 325F.

In a large bowl, whisk together the cocoa powder, flour, cinnamon, ginger, black pepper, nutmeg, and red chile powder. Add in the cooled nuts and dried cherries, and mix well to ensure the fruit and nuts are well coated with the dry ingredients. Set aside.

img_7679Melt the chocolate in a heatproof glass measure in a microwave on the low setting, in 10 second bursts, until nearly melted. Stir until completely melted and set aside.

Heat the sugar and honey in a small saucepan (ideally nonstick) fitted with a candy thermometer until the temperature reads 240F.

Immediately pour the hot sugar syrup over the nut mixture, add the melted chocolate, and stir well. Use a large, sturdy wooden spoon and be prepared to really dig in there to mix this. It becomes more difficult as the sugar syrup cools so work diligently.

img_7680Scrape the batter into the prepared pan and smooth the top. David recommends using damp hands to press the mixture flat – works well.

Bake the panforte for 35 – 40 minutes; if you touch it, your finger will come away clean when it’s done. (Be careful not to overcook it or it will be too firm to cut when it’s cool.) Mine was done at 35 minutes.

img_7684Cool on a rack for 15 minutes, then run a warm knife around the edge to loosen it from the pan. Remove the springform carefully, then cool completely.

When cool, remove the bottom of the springform pan and peel away the parchment. Sprinkle the panforte with powdered sugar and rub it in with your hands, top, bottom, and sides.

Serve in thin slices.

Storage: Panforte can be kept for several months, well wrapped, at room temperature.

Enjoy!


Soul Satisfying Brownies

IMG_5471In the film version of Elizabeth Gilbert’s must-read memoir, Eat Pray Love, Liz (aka Julia Roberts) introduces her Italian tutor to a new English word. Holding up a bottle of wine, she says, “Therapist.”

In the way that Eskimos have a hundred words for snow, I believe Americans have a thousand words for therapist. Wine is one.

Brownie is another. When you’re having one of those days, nothing is faster, easier or more satisfying to your beleaguered spirit than a brownie. Am I right?

And, in the way that there are a thousand words for therapist, there are (at least) a thousand recipes for brownies. We all have a favorite – or many favorites. I grew up making theIMG_5470 one-bowl recipe on the back of the Baker’s chocolate box. In high school, when my friends and I suddenly found ourselves hungry (you remember how that can happen, right?), the Duncan Hines Fudge Brownie mix was the answer. Although, as I recall, the yield was somewhat less than indicated on the box due to excessive batter eating.

Today, there are several brownies I enjoy: I like a dark chocolate fudgy one straight from the fridge, I like a dense IMG_5473chewy one like the kind they sell at Zaro’s Bakery in Grand Central Station (the commuter’s best friend I always say), I like a fancy one like cream cheese swirl or salted caramel swirl. They’re all good. They all make me happy. (Despite an earlier post as to whether I actually like them or not. This is about “therapist” not about best treat ever.)

But they don’t all make me satisfied. Happy stomach, happy brain, sure. Satisfied heart, soothed soul? For that I need a no-fuss, traditional, cakey brownie. No bells or whistles, no fancy ingredients you might not have. Just the basics, whisked together in a single bowl and baked for 25 minutes.

It’s a cure for what ails you. (Or at least one of them.)

Soul Satisfying Brownies

Yield: 16 2-inch brownies

Note: I am tinkering with low cholesterol and gluten-free baking. This recipe reflects both. You can make it the “regular” way using whole eggs and unbleached flour.)

Ingredients

6 Tbs (3/4 stick) unsalted butter

2 oz unsweetened chocolate, coarsely chopped

1/3 c sugar

2/3 c brown sugar, packed (I used turbinado crystals for a cakier texture)

½ c Egg Beaters egg substitute (or two large eggs)

1 tsp vanilla

½ c Cup4Cup gluten free flour (or the same amount of regular flour)

¼ tsp salt

Preparation

Butter an 8-inch square pan, lining the bottom and two sides with parchment leaving a 1-inch overhang. Set aside.

Preheat oven to 375.

Combine the chopped chocolate and butter in a microwave safe dish (I use a Pyrex measuring cup), and zap on low until melted. Check every 15 seconds and stir. Set aside.

IMG_5474Combine sugars in a medium mixing bowl. Add the chocolate-butter mixture and whisk to combine. Add the Egg Beaters, in two additions, whisking after each. Whisk in the vanilla. Add the flour and salt, whisking until combined.

Scrape the batter into the prepared pan and smooth the top. Bake for about 25 minutes until edges just start to pull away.

Cool in pan on rack for 15 minutes. Remove from pan using parchment handles and cool on rack completely.

Enjoy!


Hint of Spring Orange Raspberry Cakelets

There are so many things to love about being a food blogger. Chief among them is all of theIMG_4560 discoveries you make almost daily, of other bloggers, artisanal makers, baby brands, established brands you’ve never heard of. And of course the endless falling in love, over and over, with recipes, tastes, and photos. Food porn is real as you. well. know.

In the past year, I’ve discovered many delicious things going on in the UK and Down Under. You’ve all been there, you Like one thing on FB and then see something it Likes and you’re down a rabbit hole of Eat Me and Drink Me discovery. This particular journey started with the Great British Baking Show (on Netflix and then on PBS). Not only was each guest lovelier and more adorable than then next, but the judges were rigorous and the challenges significant. Plus I learned (learnt?) a lot of new terminology, including “checking the bake” which is the quality/crumb of the finished product.

From there, I somehow ran into delicious.magazine, also from the UK, that has a terrific social media presence and great recipe links/photos on FB (from which I made the Chocolate Molasses Buttons holiday cookies). And from there, I encountered Dish magazine from New Zealand – more lovely recipes for things I never heard of like Caramel IMG_4557Slice (aka Millionaire Shortbread) and this week’s delicious little bites.

The great thing about these orange raspberry mini loaves is how easy they are to make, which was key this past weekend because, as you likely know, we in the US “sprIMG_4546ang forward,” losing an hour of sleep. I also always seem to crave citrus and berries on spring forward Sunday, so the recipe was perfect. The extra special bonus was that I had an excuse to buy silicone financier pans – my first time baking in silicone and in that shape. The fun never ends!

The pans were terrific to work with, the perfect little loaves just popped out. The results are delicious, wonderful with tea. I don’t normally go for glaze but it adds a nice note here. If you look at the picture accompanying the recipe via the link above, you’ll see they have a pristine white glaze. I do not know how OJ and confectionery sugar would ever be snow white. C’est la vie. They taste terrific.

Note: You have to love nutmeg. I used powdered, jarred nutmeg which might have a stronger flavor than fresh. If you do the same, I suggest you halve the amount if you’re not a nutmeg fan. Also, the poppy seeds don’t add much to the result so don’t run to the store for them if you have everything else.

Next time I make these, I’m going to try lemon instead of orange. I just love lemons and raspberries together.

Happy spring!

Raspberry Orange Cakelets

Adapted from a recipe by Dish Magazine

Ingredients

2 sticks plus 1 Tbs unsalted butter, room temperature

1¼ c granulated sugar

1 tsp vanilla extract

4 large eggs, room temperature

2 c flour

1 tsp freshly grated nutmeg (or ½ tsp powdered nutmeg from a jar)

½ tsp baking powder

½ tsp sea salt

2 Tbs poppy seeds (optional)

2 Tbs plain yogurt

Juice of half medium orange

Finely grated zest of one medium orange

2 cups frozen raspberries

Glaze

1½ cups confectionery sugar

Juice of 1 orange

Preparation

rasp batterPreheat oven to 350. Arrange two 12-hole silicone financier pans on baking sheets and set aside.

Combine the flour, nutmeg, baking powder, salt and poppy seeds in a medium bowl and set aside.

Whisk the yogurt, orange juice and orange zest together; set aside.

In the bowl of an electric mixer with the paddle attachment, beat the butter, sugar and vanilla together until very light and pale. Add the eggs one at a time, beating well after each addition.

Stop the mixer and add both the dry ingredients and the yogurt/OJ mixture to the butter. Mix on low until just combined.

Add the raspberries and, using a large rubber spatula, gently fold into the batter. Note: if you use raspberries right from the freezer your batter will rasp pansharden a bit around them.

Use a #20 ice cream scoop to drop scant scoops of batter into each section of the pans. (You’ll get 15-18 cakes.) Smooth tops with a small offset spatula.

Put the cookie sheets with the financier pans into the oven and bake for about 20 minutes. A skewer inserted into the center should come out clean.

IMG_4558Cool in the molds for 30 minutes before removing to a rack and cooling completely.

Glaze: Stir enough orange juice into the confectionery sugar to make a thick but pourable glaze. Drizzle over the cakes.

Store the cakes in an airtight container for up to 3 days. Makes 15-18 cakes.

 If you don’t have the mini loaf tin you can use standard muffin tins. You will probably get 14–15 cakes from the mixture as the tin capacity is smaller.

Enjoy!


When Food Is Love

5715_10153882448957375_7877712364016207751_nI’m a person who, let’s say, has more rainy days than most people. I’ve managed my depression for decades with medication, but I still occasionally have moments when the clouds gather. Then, as with any other occasion really, I head to the kitchen. Because what I want is to feed myself.

I’m not talking about compulsivity or “eating your feelings.” I’m saying feel the feelings and eat anyway. But take the time to discover what really feeds you in those low moments. It took some years of trial and error before I really accepted that your typical “mood food” doesn’t help me: I don’t want chocolate, I don’t want lots of sugar or anything overly sweet, I don’t want junk food that forces my body to work extra hard to process.

I want things that are super soothing and easy to eat. Things that are easy to prepare and redolent of comfort, familiarity, and warmth. “Easy to prepare” is key, because I’ve learned that what makes the biggest difference in feeding – and lifting – my depression is the act of cooking. Because what I want most is, quite literally, to feed myself. If preparing food for others is an act of love, then preparing food for yourself is, in my opinion, the ultimate act of self love.

So when the storm clouds gathered recently, I headed to the kitchen to prepare a tried-and-true comfort food and to discover a new one. I offer you both. Because both made me feel better. As did my animals, my blankets, my art, and lots of British TV via acorn.tv.
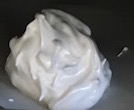
Baked Custard

IMG_4462

Note the moussey top and silky custard bottom!

Another favorite from the gingham Better Homes & Gardens cookbook. I’ve been making this since childhood. I’ve modified the recipe a bit to use roughly equal parts heavy cream and whole milk. Why? Because, for some reason, it results in a layered custard. The top is mousse-like while the bottom is the shiny, silky traditional custard. It’s just wonderful at room temperature or straight out of the fridge. It is a lot of dairy and eggs, so clearly not meant for every day.

Rainy Day Baked Custard

Adapted from the Better Homes & Gardens Cookbook


Ingredients

1 c heavy cream

1c whole milk

½ c sugar

4 large eggs

1 Tbs vanilla

Ground nutmeg to taste

Preparation

Set oven to 350 degrees. Set aside a 1.5 quart baking dish and a roasting pan large enough to hold the baking dish.

Pour cream and milk into a large bowl. Whisk to combine. Whisk in sugar, followed by the eggs, one at a time, whisking after each addition. Whisk in the vanilla. Pour into the baking dish. Sprinkle with nutmeg to taste – I like a generous coating.

Set the dish into the roasting pan and add hot water to come halfway up the side of the baking dish.

Bake for 45 minutes. Custard should be set. If it’s still quite liquid, nudge the heat up to 375 for another 10-15 minutes. It should be set by then.

Remove from oven, and remove baking dish from water bath, and let cool on rack.

If you want to eat it warm, let it sit for about 15 minutes. Otherwise cool to room temperature and enjoy, or refrigerate and enjoy some more.

Comfort Cake

A few months ago I bought The Rustic Italian Bakery by Veronica Lavenia. When I was in Italy, I noticed the traditional sweets were not all that sweet. And that little slices of something were often served in the afternoon with coffee. I’ve got a favorite ItalianIMG_4500 cornmeal cake recipe and “rustic” is the perfect word for it. It’s homey, flavorful but not sweet, and utterly delicious. So naturally I wanted to possess an entire book of such recipes!

Levinia’s book is a lot more than that. She has a “real” food ethos so her recipes often call for alternative flours and grains, varied sweeteners, and organic ingredients. When I bought the book, I didn’t have a pantryful of alternative flours. Since I began baking from Alice Medrich’s Flavor Flours, though, my stock has increased. And so, on a gloomy day, I leafed through Levinia’s book in search of something appealing I could make with ingredients on hand. Torta Paradiso was invented by a priest and made famous across Italy in 1878 by pastry chef Enrico Vigoni (says Lavenia). I had to modify the recipe slightly because I was out of brown sugar and lemons. The original recipe, on Alimentari, also calls for cornstarch which the recipe in the book does not.

Paradiso Cake – Gluten Free

Adapted from The Rustic Italian Bakery, note most ingredients measured by weight

Ingredients

3 fl oz mild extra-virgin olive oil

3.5 oz turbinado sugar

4 large eggs, separated

5 Tbs heavy cream

Scant 1/4 cup whole milk

9 oz rice flour

1/2 oz baking powder

Zest of 1 medium orange

Powdered sugar to taste

Preparation

Set oven to 350. Lightly grease a 9-inch cake pan (with 2 inch sides), lining the bottom with parchment. Set aside.

In a small bowl combine the rice flour, baking powder and orange zest. Set aside.

In the bowl of an electric mixer, combine the olive oil and sugar, mixing on medium until sugar dissolves slightly, about 3-5 minutes. With the mixer running, add the egg yolks, one at a time, mixing well after each addition. Beat in the cream, followed by the flour mixture, mixing thoroughly.

batterNote: At this point, my batter looked more like cookie dough. I couldn’t imagine folding beaten egg whites into it. So I added enough whole milk to make a smooth cake batter. If you find yourself in a similar situation, gradually add the milk, up to a 1/4 cup, until your batter looks right.

Pour the batter into a large mixing bowl. Clean your mixer bowl, attach the wire whip, and whip the egg whites until stiff. Fold them into the cake batter using a large rubber spatula or balloon whisk, pulling the batter from the bottom up.

IMG_4499Pour the mixture into the prepared cake pan, smoothing the top with an offset spatula.

Bake, in preheated oven, for 30 minutes. A tester should come out clean. My cake was done, but very pale in color.

IMG_4510Cool in pan on rack for 15 minutes. Unmold and cool on rack completely. Dust with powdered sugar to taste.

This cake is not sweet and has a lovely soft but hearty texture. It’s even better the second day when all the powdered sugar has sunk in adding a touch more sweetness to the cake.

Enjoy!

And if you find yourself struggling with difficult emotions, there are a number of ways to get help: Call the Employee Assistance Program offered by your employer to access short term counseling, look for a good therapist, join an online community like To Write Love on Her Arms – just do something. Depression is common and can be managed. Blessings!


Salted Caramel ‘Need I Say More’ Cookies

Hello friends, it has been quite a while since we’ve been in touch! I’m back with you, IMG_4168offering, of all things, a cookie.

Not just any cookie though. A cavity inducing combo of butter, chocolate and caramel. A carbo-phobe’s nightmare. A cookie that will get real with your resolutions and shatter them all to heck. And you. won’t. care.

From whence comes such a thing? A delightful blog called Grandbaby Cakes where Jocelyn Delk Adams shares the love of baking she learned at her grandmother’s knee. I saw a picture of these cookies on Instagram and had to track them down.

Salted Caramel. Chocolate Chips. OK?

Perhaps I’m late to this party. Perhaps you all knew about hiding caramel inside a ball of cookie dough, then sprinkling with salt. But if you didn’t, don’t be afraid. Take my hand. We’ll do this together.

Note: Fresh from the oven, I found these cookies far too sweet. I sadly set them aside thinking I’d have to give them to my sugar-cube loving friends. The next day, though, they looked so very delicious I ate one. Fabulous. Absolutely fabulous.

You won’t be sorry. Neither will your dentist. .

Salted Caramel Chocolate Chip Cookies

Adapted from a recipe by Jocelyn Delk Adams

Ingredients

2½ c flour

2 tsps cornstarch

¾ tsp salt

1 tsp baking powder

1 tsp baking soda

1 c unsalted butter (room temperature, or beaten cold until soft)

½ c granulated sugar

1½ c packed brown sugar

1 large egg plus 2 egg yolks at room temperature

1 Tbs pure vanilla extract

1 ½ c semisweet chocolate chips (I use Guittard, just shy of a 12 oz package)

1 11-oz bag Kraft caramels, unwrapped

Sea Salt

Preparation

Preheat oven to 350. Line two large baking sheets with parchment, set aside,

Whisk together flour, cornstarch, salt, baking powder and baking soda in a medium bowl. Set aside.IMG_4181

Unwrap caramels and cut each into quarters.

In the bowl of an electric mixer, cream butter and both sugars until light and fluffy.

Lightly beat together egg, yolks and vanilla, then add to the butter in three additions, beating until smooth after each addition.

On low speed, add the flour mixture in three intervals beating well after each addition. Add chocolate chips and mix until well distributed.

Cover the bocaramelswl with plastic wrap and refrigerate for at least one hour. (according to Jocelyn, two hours is better!)

Use a #40 ice cream scoop to gather balls of dough. Press 4 caramel pieces into each ball and place on prepared baking sheets, 6 balls per sheet.


IMG_4170Bake 14-16 minutes until brown. Remove from oven, sprinkle with sea salt and let cool on sheets 10 minutes before moving to a rack to cool completely. I rushed the cooling step and created little caramel aliens on the bottom of my rack.

Makes about 30 large incredibly delicious cookies.

IMG_4184

Bonus Holiday Cookie!

OK, so yes, we completed the Seven Days of Cookies, but in the course ofIMG_3696 all that baking, I came across a recipe from Alice Medrich that cried out to be tried. So even though I’ve been rolling [in] dough for a week, I had to make one more batch of cookies.

These are called Pebbly Beach Fruit Squares. The recipe is from Medrich’s Chewy Gooey Crispy Crunchy Melt-in-Your-Mouth Cookies. These are beyond delicious, a crispy-chewy sandwich of delightfulness.

Notes

  • Alice says these cookies can be customized to your taste through your choice of fruit and spice. I love cranberry and orange so I used dried cranberries and candied orange peel with just a touch of cinnamon.
  • Make sure your fruit is moist! If it’s not, Alice says to soak it in water, juice or spirits for about 20 minutes (any longer and it will be too mushy to use). Pat dry before using.
  • Do the best you can when rolling the dough. It was a bit sticky so I rolled it between two pieces of parchment, flipping it several times and smoothing the paper. Even then I fell short of the desired 16.5 inch length.

I wasn’t sure whatIMG_3697 to expect from this cookie. I knew it would be good (Medrich, dried fruit, butter), but I wasn’t prepared for just how good. The kind of good that makes you laugh out loud.

Which is truly the best way to conclude a “baker’s dozen” of Seven Days of Cookies.

Enjoy! And have a beautiful Christmas!

Pebbly Beach Fruit Squares

Adapted from Alice Medrich

Ingredients

1 3/4 c plus 2 Tbs flour

1/2 tsp baking powder

1/4 tsp salt

8 Tbs (1 stick) unsalted butter, softened but still cool

3/4 c granulated sugar

1 large egg

1 tsp vanilla

Finely grated zest of one medium lemon and one smallish orange

1/2 c moist candied orange peel

½ c moist dried cranberries (coarsely chopped to about the same size as the orange peel)

1/4 tsp cinnamon

1/4 cup crystal sugar

Preparation

Whisk together flour, baking powder, and salt in a bowl and set aside.

squareIn a medium bowl (with a mixer set on low), beat butter with the granulated sugar until smooth and well blended but not fluffy. Add the egg, vanilla, and both zests, and beat until smooth. Add flour mixture and mix until completely incorporated.

Divide the dough in half and form each into a rectangle about ¼ inch thick. Wrap the patties in plastic wrap and refrigerate for at least 2 hours.

Preheat oven to 350 degrees. Position racks in the upper and lower thirds of oven. Line two large baking sheets with parchment and set aside.

In a small bowl, stir together the dried fruits with the cinnamon.

Remove dough from the refrigerator and let sit for 15 minutes to soften slightly.

IMG_3682On a sheet of parchment at least 17 inches long, roll one piece of dough into a rectangle 8.5 inches by 16.5 inches. With a short side facing you, scatter half of the dried fruit on the bottom half of the dough. Fold top half of the dough over fruit, using the paper as a handle. Gently peel paper from the top of dough. (If it sticks, chill dough for a few minutes until the paper peels easily.)

Press the top of the dough down lightly, then dust with half of the coarse sugar, again patting it lightly to make sure the sugar adheres. Use a heavy knife to trim thIMG_3683e edges. Then cut it into 4 strips and then cut each strip into 4 pieces to make 16 squares. Place cookies 2 inches apart on lined or greased cookie sheets. Repeat with remaining dough, fruit, and sugar.

Bake for 12 to 15 minutes or until edges are lightly browned. Rotate pans from top to bottom and from front to back halfway through the baking time to ensure even baking. Let cool on sheets for about 10 minutes, then move to racks to cool completely.

Cookies keep in an airtight container for a week. Yields 24 to 32 squares. I wasn’t able to roll my dough to the full 16.5 inches so I ended up with about 24 cookies.

These are insane.


Seven Days of Cookies: Chocolate Molasses Buttons

OK, I’m veering from my original plan of only tried and true recipes to closeupinclude this one which I just discovered: Chocolate Molasses Buttons. These are a variation on the traditional molasses crinkle through the addition of cocoa and a chocolate ganache to dress them up. The cookie is crisp-chewy and the flavor is addictive. The molasses comes through clearly here, so if it’s not a favorite, I suggest you go with a traditional molasses crinkle using the best recipe I’ve found.

Also newly discovered this year is delicious. magazine out of the UK. Not sure how I stumbled across it, but their FB feed is fantastic, full of recipes and gorgeous photos. I’ve adapted this cookie recipe from their site, converting the measurements from metric to American Standard. Full disclosure: I weighed my ingredients (setting the scale to grams). If you’d like to do the same, the original recipe is here.

Enjoy!

Chocolate Molasses Buttons

Adapted from delicious. magazine.

Ingredients

1 c plus two tablespoons flour

1/4 c natural cocoa powder

¾ tsp ground cinnamon

½ tsp ground ginger

¼ tsp ground allspice

¾ tsp baking soda

½ tsp fine sea salt

10 tablespoons unsalted butter, softened

3/4 c brown sugar, packed

1 tsp vanilla extract

1 large egg

1/3 c scant, unsulphured molasses (such as Grandma’s)

Crystal sugar for rolling

For the chocolate filling;

1/4 c, generous, dark chocolate, chopped

2 Tbs unsalted butter, cut into small pieces

½ tsp unsulphured molasses (such as Grandma’s)

Preparation

For the dough,  in a medium bowl, sift together the flour, cocoa powder, cinnamon, ginger, allspice, baking soda and salt. Set aside. Line two large baking sheets with parchment, set aside.

In the bowl of an electric mixer (or a large bowl if using a hand mixer), combine the butter, brown sugar and vanilla. Beat with on medium-high for about 4 minutes or until the mixture transforms from a dark gritty mixture, to a smooth, noticeably lighter color. Beat in the egg. Beat in the molasses until blended.

Reduce the mixer speed to low and gradually add the dry ingredients, mixing until fully incorporated. Scrape dough into a medium bowl, cover with plastic wrap and chill for about  2 hours.

Preheat the oven to 350 and position racks in the upper and lower thirds of the oven.

snowPour the crystal sugar into a shallow dish. Using a small ice cream scoop with a capacity of about a tablespoon, portion the dough into balls. Roll the dough balls in the crystal sugar, coating each one completely. Even space 12 of balls on each prepared baking sheet, spacing evenly.

Bake the cookies for 10 minutes or until they are set at the edges but still very soft in the centre.

Quickly pull the baking sheets from the oven to retain the heat then, using the handle of a wooden spoon, make a deep, fairly wide indentation in the center of each cookie. Return to the oven for 5 minutes more. If the indentations have become shallow, press down again with the wooden spoon handle. Cool cookies on racks.

To make the filling, melt the chocolate and the butter in a heatproof glass measuringIMG_3617 cup. Melt in the microwave on low in 30 second bursts, stirring well after each interval. Stir in the molasses. Transfer the ganache to a small Ziploc bag or disposable piping bag  (I use a small sandwich bag draped into a drinking glass) and work it toward the corner. When ready to fill the cookies, snip off a tiny bit at the corner and fill the indent of each cooled cookie. Let sit at room temperature for about 1 hour or until the ganache is firm.

Yields aboutchocmol 24 cookies.

Note: My cookies came out flatter than the rounded version in the photo on the delicious site (which look like traditional chubby thumbprints). The taste, however, is exceptional.